
多模态大模型系列|Qwen2-VL微调实战(附完整代码) (2)
黄鹤一去不复返,白云千载空悠悠。大家好, 我是卖热干面的小女孩。很高兴能与小伙伴们分享人工智能领域的前沿技术和思考。在今天这篇文章里,小编记录了使用coco图片描述数据集,并基于lora方法对qwen2-vl-2B进行微调的实践细节。内容包括 LoRA 原理、Qwen2-VL 、swanlab的简单介绍,以及实战训练相关的数据处理、基于lora配置、qwen2-vl微调、模型合并、训练可视化结果以
黄鹤一去不复返,白云千载空悠悠。大家好, 我是卖热干面的小女孩。很高兴能与小伙伴们分享人工智能领域的前沿技术和思考。
在今天这篇文章里,小编记录了使用coco图片描述数据集,并基于lora方法对qwen2-vl-2B进行微调的实践细节。内容包括 LoRA 原理、Qwen2-VL 、swanlab的简单介绍,以及实战训练相关的数据处理、基于lora配置、qwen2-vl微调、模型合并、训练可视化结果以及模型推理测试等。
完整代码可以添加小编微信获取。
1. LoRA 原理介绍
Lora方法,即在大型语言模型上对指定参数增加额外的低秩矩阵,并在模型训练过程中,仅训练而外增加的参数。当“秩值”远小于原始参数维度时,新增的低秩矩阵参数量很小,达到仅训练很小的参数,就能获取较好的结果。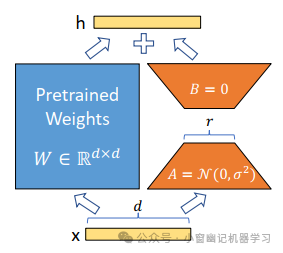
-
Lora论文:https://arxiv.org/abs/2106.09685
-
官方代码:https://github.com/microsoft/LoRA
-
HuggingFace封装的peft库:https://github.com/huggingface/peft
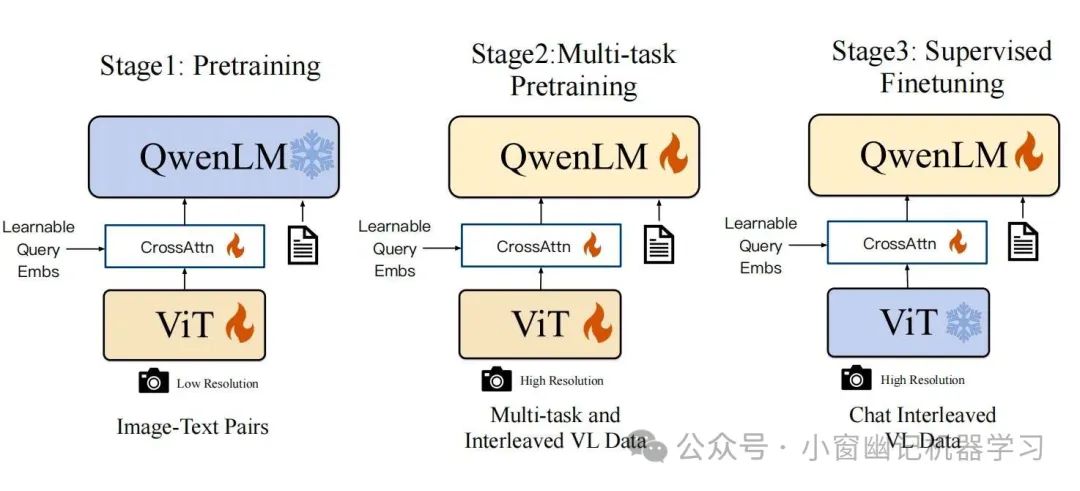
Qwen2-VL 介绍
qwen2-vl基本架构:
Qwen2-VL 是一个基于视觉-语言预训练的多模态模型,支持图像和文本的联合输入,输出是文本形式。
-
输入:图片+文本。
-
输出:仅仅文本。
架构主要包含2部分
qwen2-vl的视觉信息处理和映射
-
Vision Encoder: VIT
-
VL Adapter: 为了解决图像特征序列过长导致的效率问题. 使用cross-attention module对encode后的图像进行压缩. 同时使用二维绝对位置编码, 以减轻可能丢失的位置细节信息。 实现效果: 将视觉特征序列压缩为固定长度为256的序列.
LLM: Qwen-7B。
架构图和训练过程
qwenvl的数据格式
图像特征序列: Tokens <|vision_start|>和<|vision_end|>插入在图像特征序列的开始和结束,以划定图像内容。
对话数据:使用ChatML格式构建指令调优数据集,每个交互的陈述用两个特殊tokens(<|im_start|>和<|im_end|>),以便于对话的结束。
视觉定位 :边界框坐标被标准化到[0, 1000)范围内,并表示为"(, ), (, )"。Tokens <|box_start|>和<|box_end|>用于标记边界框文本。并引入了tokens <|object_ref_start|>和<|object_ref_end|>,以指示边界框所引用的内容。
swanlab可视化工具
SwanLab 是一款开源、轻量的 AI 模型训练跟踪与可视化工具,提供了一个跟踪、记录、比较、和协作实验的平台。简单好用,功能强化。需要自己注册账号,复制api_key进行配置即可。https://swanlab.cn/
开始实践
数据下载和处理
数据下载
coco_2014_caption数据集:https://modelscope.cn/datasets/modelscope/coco_2014_caption
小编使用如下代码下载:
from modelscope.msdatasets import MsDataset ds = MsDataset.load("coco_2014_caption", namespace="modelscope", split="train")
数据转json格式
转换前的数据是csv形式,两列分别是:
-
image_path:图片url待下载。
-
caption:图片内容描述。
转换后的数据格式以及内容示例如下:
其中图片是采用<|vision_start|>和<|vision_end|>中间的内容。
[ { "id": "identity_1", "conversations": [ { "from": "user", "value": "COCO Yes: <|vision_start|>prefix/99584.jpg<|vision_end|>" }, { "from": "assistant", "value": "A transit bus stopped at a street side that's filled with snow.&&A white bus with a painting of a blue flower on the front stopped on a street near a snow covered sidewalk. &&An empty bus parked on the side of a road.&&A picture of a bus stopped on the street.&&A bus pulled over on the road next to some snow." } ] }, ]
数据转换代码
import pandas as pd import json save_dir = "save_dir" new_image_dir = "new_image_dir" csv_files = [f"{save_dir}{a}"for a in ['coco-2024-dataset-validation.csv', 'coco-2024-dataset-train.csv']] json_files = [f"{save_dir}{a}"for a in ['dataset-validation.json', 'dataset-train.json']] keys = ["validation", "train"] for csv_file, json_file, key in zip(csv_files, json_files, keys): # 载入CSV文件 df = pd.read_csv(csv_file) conversations = [] # 添加对话数据 for i in range(len(df)): image_path = df.iloc[i]['image_path'] image_name = image_path.split("/")[-1] new_image_path = f"{new_image_dir}{key}/{image_name}" conversations.append({ "id": f"identity_{i+1}", "conversations": [ { "from": "user", "value": f"COCO Yes: <|vision_start|>{new_image_path}<|vision_end|>" }, { "from": "assistant", "value": df.iloc[i]['caption'] } ] }) # 保存为Json with open(json_file, 'w', encoding='utf-8') as f: json.dump(conversations, f, ensure_ascii=False, indent=2)
模型下载
以下是小编用过的2种下载方式
使用snapshot_download直接下载快照。
model_dir = snapshot_download(path_config['model_name'], cache_dir=path_config['pretrain'], revision="master")
使用MsDataset加载数据时下载
from modelscope.msdatasets import MsDataset ds = MsDataset.load("coco_2014_caption", namespace="modelscope", split="train")
数据处理
定义函数对每个样本进行处理, 将原始的json格式转化为模型接受的形式
input_ids: 为模型的输入,表示文本的tokenized形式。
attention_mask: 用于告诉模型哪些token是有效的,哪些是填充的。
labels: 作为模型的训练目标,表示模型应该生成的token序列。
pixel_values: 作为模型的输入,表示图像的像素信息。
image_grid_thw: 图像经过patch embedding 后的网格信息。
代码如下:
# 定义数据处理函数 def process_func(example): """ 将每个单个数据依次进行处理 """ MAX_LENGTH = 8192 input_ids, attention_mask, labels = [], [], [] conversation = example["conversations"] input_content = conversation[0]["value"] output_content = conversation[1]["value"] file_path = input_content.split("<|vision_start|>")[1].split("<|vision_end|>")[0] # 获取图像路径 messages = [ { "role": "user", "content": [ { "type": "image", "image": f"{file_path}", "resized_height": 280, "resized_width": 280, }, {"type": "text", "text": "COCO Yes:"}, ], } ] text = processor.apply_chat_template( messages, tokenize=False, add_generation_prompt=True ) # 获取文本 image_inputs, video_inputs = process_vision_info(messages) # 获取数据数据(预处理过) inputs = processor( text=[text], images=image_inputs, videos=video_inputs, padding=True, return_tensors="pt", ) inputs = {key: value.tolist() for key, value in inputs.items()} # tensor -> list,为了方便拼接 instruction = inputs response = tokenizer(f"{output_content}", add_special_tokens=False) input_ids = ( instruction["input_ids"][0] + response["input_ids"] + [tokenizer.pad_token_id] ) attention_mask = instruction["attention_mask"][0] + response["attention_mask"] + [1] labels = ( [-100] * len(instruction["input_ids"][0]) + response["input_ids"] + [tokenizer.pad_token_id] ) if len(input_ids) > MAX_LENGTH: # 做一个截断 input_ids = input_ids[:MAX_LENGTH] attention_mask = attention_mask[:MAX_LENGTH] labels = labels[:MAX_LENGTH] input_ids = torch.tensor(input_ids) attention_mask = torch.tensor(attention_mask) labels = torch.tensor(labels) inputs['pixel_values'] = torch.tensor(inputs['pixel_values']) inputs['image_grid_thw'] = torch.tensor(inputs['image_grid_thw']).squeeze(0) # 由(1,h,w)变换为(h,w) return {"input_ids": input_ids, "attention_mask": attention_mask, "labels": labels, "pixel_values": inputs['pixel_values'], "image_grid_thw": inputs['image_grid_thw']} # 数据保存为dataset-train.json和dataset-test.json, 分别加载 train_json_path = f"{data_root}dataset-train.json" test_json_path = f"{data_root}dataset-test.json" # 训练数据开始加载 with open(train_json_path, 'r') as f: data = json.load(f) train_data = data test_data = data[-4:] # 评测数据开始加载 with open(test_json_path, 'r') as f: data = json.load(f) test_data = data train_ds = Dataset.from_json(f"{data_root}dataset-train.json") train_dataset = train_ds.map(process_func)
加载模型
# 在modelscope上下载Qwen2-VL模型到本地目录下 model_dir = snapshot_download(path_config['model_name'], cache_dir=path_config['pretrain'], revision="master") # 使用Transformers加载模型权重 tokenizer = AutoTokenizer.from_pretrained(f"{path_config['pretrain']}{path_config['model_name']}", use_fast=False, trust_remote_code=True) processor = AutoProcessor.from_pretrained(f"{path_config['pretrain']}{path_config['model_name']}") model = Qwen2VLForConditionalGeneration.from_pretrained(f"{path_config['pretrain']}{path_config['model_name']}", device_map="auto", torch_dtype=torch.bfloat16, trust_remote_code=True, ) model.enable_input_require_grads() # 开启梯度检查点时,要执行该方法
lora的核心配置
# 配置LoRA config = LoraConfig( task_type=TaskType.CAUSAL_LM, target_modules=["q_proj", "k_proj", "v_proj", "o_proj", "gate_proj", "up_proj", "down_proj"], inference_mode=False, # 训练模式 r=8, # Lora 秩, 配置一个较小的整数,2,4,8,64等。 lora_alpha=16, lora_dropout=0.1, # Dropout 比例 bias="none", ) # 获取LoRA模型 peft_model = get_peft_model(model, config)
swanlab的配置
from swanlab.integration.transformers import SwanLabCallback import swanlab swanlab_api_key = ""# 需要再swanlab上注册,复制自己的api_key进来 swanlab.login(api_key = swanlab_api_key) # 设置SwanLab回调 swanlab_callback = SwanLabCallback( project="Qwen2-VL-finetune", experiment_name="qwen2-vl-coco2014", config={ "model": "https://modelscope.cn/models/Qwen/Qwen2-VL-2B-Instruct", "dataset": "https://modelscope.cn/datasets/modelscope/coco_2014_caption/quickstart", "github": "https://github.com/datawhalechina/self-llm", "prompt": "COCO Yes: ", "train_data_number": len(train_data), "lora_rank": 8, "lora_alpha": 16, "lora_dropout": 0.1, }, )
训练代码
# 配置训练参数 args = TrainingArguments( output_dir=f"{path_config['weights_out']}Qwen2-VL-{model_scale}B", per_device_train_batch_size=4, gradient_accumulation_steps=4, logging_steps=10, logging_first_step=5, num_train_epochs=10, save_steps=500, learning_rate=1e-4, save_on_each_node=True, gradient_checkpointing=True, load_best_model_at_end=True, report_to="none", ) # 配置Trainer trainer = Trainer( model=peft_model, args=args, train_dataset=train_dataset, data_collator=DataCollatorForSeq2Seq(tokenizer=tokenizer, padding=True), callbacks=[swanlab_callback], ) # 开启模型训练 trainer.train()
模型合并
# 保存最佳模型 trainer.save_model(f"{path_config['weights_out']}Qwen2-VL-{model_scale}B/best_model") tokenizer.save_pretrained(f"{path_config['weights_out']}Qwen2-VL-{model_scale}B/best_model")
训练可视化展示
直接加载合并后的模型,评测代码:
def predict(messages, model): # 准备推理 text = processor.apply_chat_template( messages, tokenize=False, add_generation_prompt=True ) image_inputs, video_inputs = process_vision_info(messages) inputs = processor( text=[text], images=image_inputs, videos=video_inputs, padding=True, return_tensors="pt", ) inputs = inputs.to("cuda") # 生成输出 generated_ids = model.generate(**inputs, max_new_tokens=128) generated_ids_trimmed = [ out_ids[len(in_ids):] for in_ids, out_ids in zip(inputs.input_ids, generated_ids) ] output_text = processor.batch_decode( generated_ids_trimmed, skip_special_tokens=True, clean_up_tokenization_spaces=False ) return output_text[0] # 读取测试数据 with open(f"{data_root}dataset-test.json", "r") as f: test_dataset = json.load(f) test_image_list = [] for item in test_dataset[:5]: input_image_prompt = item["conversations"][0]["value"] # 去掉前后的<|vision_start|>和<|vision_end|> origin_image_path = input_image_prompt.split("<|vision_start|>")[1].split("<|vision_end|>")[0] messages = [{ "role": "user", "content": [ { "type": "image", "image": origin_image_path }, { "type": "text", "text": "COCO Yes:" } ]}] response = predict(messages, val_model) messages.append({"role": "assistant", "content": f"{response}"}) print(messages) # 加载合并后的模型 merged_model_path = f"{path_config['weights_out']}Qwen2-VL-2B/merged_best_model"# 合并后模型的路径 processor = AutoProcessor.from_pretrained(merged_model_path) tokenizer = AutoTokenizer.from_pretrained(merged_model_path, trust_remote_code=True) val_model = Qwen2VLForConditionalGeneration.from_pretrained( merged_model_path, device_map="auto", torch_dtype=torch.bfloat16, ) print("Merged model loaded successfully!") def predict(messages, model): # 准备推理 text = processor.apply_chat_template( messages, tokenize=False, add_generation_prompt=True ) image_inputs, video_inputs = process_vision_info(messages) inputs = processor( text=[text], images=image_inputs, videos=video_inputs, padding=True, return_tensors="pt", ) inputs = inputs.to("cuda") # 生成输出 generated_ids = model.generate(**inputs, max_new_tokens=128) generated_ids_trimmed = [ out_ids[len(in_ids):] for in_ids, out_ids in zip(inputs.input_ids, generated_ids) ] output_text = processor.batch_decode( generated_ids_trimmed, skip_special_tokens=True, clean_up_tokenization_spaces=False ) return output_text[0]
效果
使用评测机金总大量测试,模型在对图片描述方面确实更加专业,一下以coco数据集的图片360792.jpg为例对结果进行展示: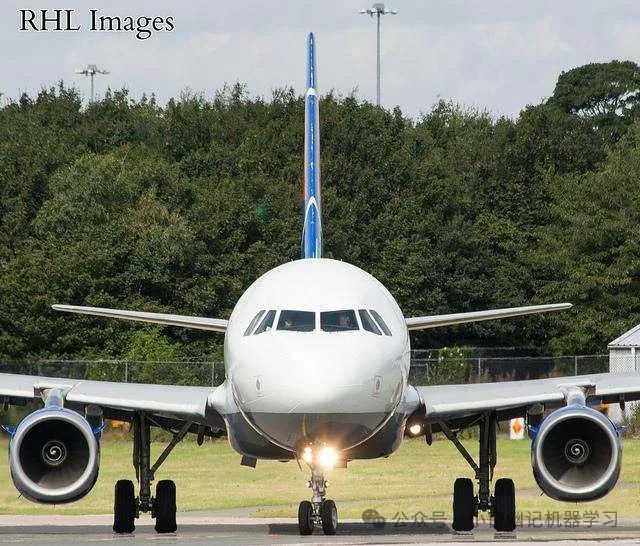 原版的结果为:
|
R Images(25,13),(274,69)
|
| — |
微调版本的总结为:
|
An airplane is parked on the runway。
|
| — |
从测试结果来看, 微调后的模型确实更倾向于coco_2014_cap数据的对话方式。对多张图测试亦如此,这里不再赘述。
总结
通过以上步骤,我们成功使用 LoRA 方法对 Qwen2-VL-2B 模型进行了微调,并在 COCO 数据集上进行了评测。LoRA 方法在保持模型性能的同时,显著减少了微调参数的数量,提高了训练效率。
零基础入门AI大模型
今天贴心为大家准备好了一系列AI大模型资源,包括AI大模型入门学习思维导图、精品AI大模型学习书籍手册、视频教程、实战学习等录播视频免费分享出来。
有需要的小伙伴,可以点击下方链接免费领取【保证100%免费】
😝有需要的小伙伴,可以保存图片到wx扫描二v码免费领取【保证100%免费】🆓
1.学习路线图

第一阶段: 从大模型系统设计入手,讲解大模型的主要方法;
第二阶段: 在通过大模型提示词工程从Prompts角度入手更好发挥模型的作用;
第三阶段: 大模型平台应用开发借助阿里云PAI平台构建电商领域虚拟试衣系统;
第四阶段: 大模型知识库应用开发以LangChain框架为例,构建物流行业咨询智能问答系统;
第五阶段: 大模型微调开发借助以大健康、新零售、新媒体领域构建适合当前领域大模型;
第六阶段: 以SD多模态大模型为主,搭建了文生图小程序案例;
第七阶段: 以大模型平台应用与开发为主,通过星火大模型,文心大模型等成熟大模型构建大模型行业应用。
2.视频教程
网上虽然也有很多的学习资源,但基本上都残缺不全的,这是我自己整理的大模型视频教程,上面路线图的每一个知识点,我都有配套的视频讲解。


(都打包成一块的了,不能一一展开,总共300多集)
3.技术文档和电子书
这里主要整理了大模型相关PDF书籍、行业报告、文档,有几百本,都是目前行业最新的。
4.LLM面试题和面经合集
这里主要整理了行业目前最新的大模型面试题和各种大厂offer面经合集。
👉学会后的收获:👈
• 基于大模型全栈工程实现(前端、后端、产品经理、设计、数据分析等),通过这门课可获得不同能力;
• 能够利用大模型解决相关实际项目需求: 大数据时代,越来越多的企业和机构需要处理海量数据,利用大模型技术可以更好地处理这些数据,提高数据分析和决策的准确性。因此,掌握大模型应用开发技能,可以让程序员更好地应对实际项目需求;
• 基于大模型和企业数据AI应用开发,实现大模型理论、掌握GPU算力、硬件、LangChain开发框架和项目实战技能, 学会Fine-tuning垂直训练大模型(数据准备、数据蒸馏、大模型部署)一站式掌握;
• 能够完成时下热门大模型垂直领域模型训练能力,提高程序员的编码能力: 大模型应用开发需要掌握机器学习算法、深度学习框架等技术,这些技术的掌握可以提高程序员的编码能力和分析能力,让程序员更加熟练地编写高质量的代码。
1.AI大模型学习路线图
2.100套AI大模型商业化落地方案
3.100集大模型视频教程
4.200本大模型PDF书籍
5.LLM面试题合集
6.AI产品经理资源合集
5.免费获取
这份完整版的大模型 AI 学习资料已经上传CSDN,朋友们如果需要可以微信扫描下方CSDN官方认证二维码或者点击以下链接都可以免费领取【保证100%免费】
更多推荐


 5
5 0
0- 0


 已为社区贡献2条内容

所有评论(0)