LLaMA-Factory微调LLama2
关于如何使用LLaMA-Factory(版本0.6.2)对LLama2模型进行微调的指南。文档内容主要分为以下几个部分:下载安装:提供了通过git克隆仓库和使用pip安装LLaMA-Factory的指令,以及使用Docker安装环境的方法。准备数据集:包括将Excel表格数据转换成JSON格式的步骤,以及如何计算生成的JSON数据的sha1值。单卡训练微调:介绍了如何启动web版本的训练,调整配置
LLaMA-Factory(0.6.2版本)微调LLama2
1.下载安装
git clone https://github.com/hiyouga/LLaMA-Factory.git
cd LLaMA-Factory
pip install -e .[metrics]
使用docker安装环境
docker build -f ./Dockerfile -t llama-factory:latest .
docker run --gpus=all \
-v /data1/models:/root/.cache/huggingface/ \
-v /workspace/data:/app/data \
-v /workspace/output:/app/output \
-v /workspace/code:/app/code \
-e CUDA_VISIBLE_DEVICES=2,3 \
-e no_proxy=192.168.1.0,localhost,127.0.0.1 \
-p 9091:8080 \
--shm-size 16G \
--name llama_factory \
-d llama-factory:latest \
python src/train_web.py
ssh root@10.10.6.3 -L 0.0.0.0:9091:127.0.0.1:9091
在 ~/.bashrc中添加环境变量
NCCL_P2P_DISABLE="1" NCCL_IB_DISABLE="1"
2.准备数据集
2.1.将excel表格数据转换成json格式数据 再将转换好的数据文件名写到datainfo.json文件中
import openpyxl
import json

# 打开 Excel 文件
workbook = openpyxl.load_workbook(r"C:\Users\19604\Desktop\ambar.xlsx")

# 创建一个空列表来存储所有工作表的 JSON 数据
all_json_data = []

# 遍历所有工作表
for sheet_name in workbook.sheetnames:
    sheet = workbook[sheet_name]

    # 提取问题和答案列
    questions = []
    answers = []
    for row in range(2, sheet.max_row + 1):
        question = sheet.cell(row=row, column=2).value
        answer = sheet.cell(row=row, column=3).value

        # 检查是否为空行
        if question is not None and answer is not None:
            questions.append(question)
            answers.append(answer)

    # 将数据转换为所需的 JSON 格式
    data = [
        {
            "instruction": "回答问题这一要求",
            "input": question,
            "output": answer
        }
        for question, answer in zip(questions, answers)
    ]

    # 将当前工作表的 JSON 数据添加到总列表中
    all_json_data.extend(data)

# 将所有 JSON 数据写入文件
with open('issue_data.json', 'w', encoding='utf-8') as f:
    json.dump(all_json_data, f, indent=2,ensure_ascii=False)

print("JSON data saved to 'output.json'")
2.2.计算生成的json数据的sha1值 在后续将数据写入datainfo.json中时填入
import hashlib
def calculate_sha1(file_path):
    sha1 = hashlib.sha1()
    try:
        with open(file_path, 'rb') as file:
            while True:
                data = file.read(8192)  # Read in chunks to handle large files
                if not data:
                    break
                sha1.update(data)
        return sha1.hexdigest()
    except FileNotFoundError:
        return "File not found."

# 使用示例
file_path = r'E:\研究生\工作\浩瀚深度\工作\code\LLM\issue_data.json'  # 替换为您的文件路径
sha1_hash = calculate_sha1(file_path)
print("SHA-1 Hash:", sha1_hash)
3.单卡训练微调
3.1.启动web版本的训练
(llm) PS E:\llm-train\LLaMA-Factory> export no_proxy=192.168.1.0,localhost,127.0.0.1
(llm) PS E:\llm-train\LLaMA-Factory> set CUDA_VISIBLE_DEVICES=0
(llm) PS E:\llm-train\LLaMA-Factory> python src/train_web.py
Running on local URL:  http://0.0.0.0:7860

To create a public link, set `share=True` in `launch()`
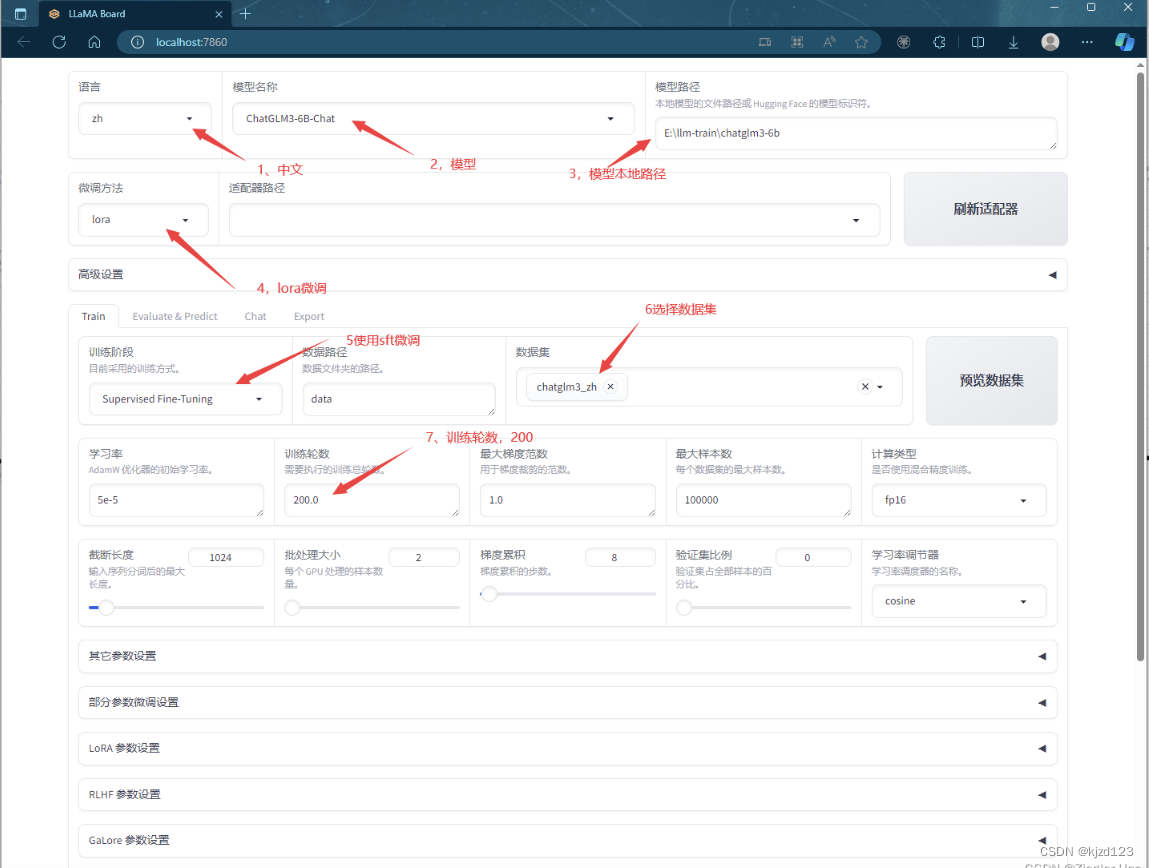
3.2.调整配置,浏览器打开:http://localhost:9090
可以选择多种微调方式


可以选择多种微调策略

预览命令
CUDA_VISIBLE_DEVICES=2 python src/train_bash.py \
    --stage sft \
    --do_train True \
    --model_name_or_path /root/.cache/huggingface/llama2/Llama-2-7b-chat-hf \
    --finetuning_type lora \
    --template llama2 \
    --dataset_dir data \
    --dataset issue_data \
    --cutoff_len 1024 \
    --learning_rate 5e-05 \
    --num_train_epochs 3.0 \
    --max_samples 100000 \
    --per_device_train_batch_size 2 \
    --gradient_accumulation_steps 8 \
    --lr_scheduler_type cosine \
    --max_grad_norm 1.0 \
    --logging_steps 5 \
    --save_steps 100 \
    --warmup_steps 0 \
    --optim adamw_torch \
    --report_to none \
    --output_dir saves/LLaMA2-7B-Chat/lora/train_2024-04-16-09-18-51 \
    --fp16 True \
    --lora_rank 8 \
    --lora_alpha 16 \
    --lora_dropout 0.1 \
    --lora_target q_proj,v_proj \
    --plot_loss True
3.3.开始微调
报这个环境变量的问题 在 ~/.bashrc中添加环境变量 NCCL_P2P_DISABLE=“1” NCCL_IB_DISABLE=“1”


3.4训练结束

3.5 微调模型导出

3.6使用我们导出的微调好的模型,进行对话

3.7.训练加速
下述命令行大致对应了web UI启动微调所调用的命令,我们可以添加gradient_checkpointing True参数进一步节省显存,增大per_device_train_batchsize。可以添加–sft_packing参数,该参数能够将多个样本拼接在一起,防止计算资源浪费。
CUDA_VISIBLE_DEVICES=2,NCCL_IB_DISABLE="1",NCCL_IB_DISABLE="1"
python src/train_bash.py \
    --stage sft \
    --do_train True \
    --model_name_or_path  ~/.cache/huggingface/llama2/Llama-2-7b-chat-hf \
    --finetuning_type lora \
    --template llama2 \
    --dataset_dir /app/data \
    --dataset issue_data \
    --cutoff_len 1024 \
    --learning_rate 5e-05 \
    --num_train_epochs 3.0 \
    --max_samples 100000 \
    --per_device_train_batch_size 2 \
    --gradient_accumulation_steps 8 \
    --lr_scheduler_type cosine \
    --max_grad_norm 1.0 \
    --logging_steps 5 \
    --save_steps 100 \
    --warmup_steps 0 \
    --optim adamw_torch \
    --report_to none \
    --output_dir saves/LLaMA2-7B-Chat/lora/train_2024-04-15-15-12-07 \
    --fp16 True \
    --lora_rank 8 \
    --lora_alpha 16 \
    --lora_dropout 0.1 \
    --lora_target q_proj,v_proj \
    --plot_loss True
4多卡训练微调
4.1使用deepspeed进行分布式训练
# 单卡的使用方法
deepspeed --num_gpus=1 examples/pytorch/translation/run_translation.py ...
# 单卡,并指定对应的GPU
deepspeed --include localhost:1 examples/pytorch/translation/run_translation.py ...
# 多GPU的使用方法1
torch.distributed.run --nproc_per_node=2 your_program.py <normal cl args> --deepspeed ds_config.json
# 多GPU的使用方法2
deepspeed --num_gpus=2 your_program.py <normal cl args> --deepspeed ds_config.json
单卡指定显卡使用方法
deepspeed --include localhost:3 src/train_bash.py \
    --deepspeed ds_config.json \
    --stage sft \
    --do_train True \
    --model_name_or_path  ~/.cache/huggingface/llama2/Llama-2-7b-chat-hf \
    --finetuning_type lora \
    --template llama2 \
    --dataset_dir /app/data \
    --dataset issue_data \
    --cutoff_len 1024 \
    --learning_rate 5e-05 \
    --num_train_epochs 3.0 \
    --max_samples 100000 \
    --per_device_train_batch_size 1 \
    --gradient_accumulation_steps 2 \
    --lr_scheduler_type cosine \
    --max_grad_norm 1.0 \
    --logging_steps 5 \
    --save_steps 100 \
    --warmup_steps 0 \
    --optim adamw_torch \
    --report_to none \
    --output_dir saves/LLaMA2-7B-Chat/lora/train_2024-04-15-15-12-08 \
    --fp16 True \
    --lora_rank 8 \
    --lora_alpha 16 \
    --lora_dropout 0.1 \
    --lora_target q_proj,v_proj \
    --plot_loss True

ds_config.json写法
{ "train_batch_size": "auto", "train_micro_batch_size_per_gpu": "auto", "gradient_accumulation_steps": "auto", "gradient_clipping": "auto", "zero_allow_untested_optimizer": true, "fp16": { "enabled": "auto", "loss_scale": 0, "initial_scale_power": 16, "loss_scale_window": 1000, "hysteresis": 2, "min_loss_scale": 1 }, "zero_optimization": { "stage": 2, "allgather_partitions": true, "allgather_bucket_size": 5e8, "reduce_scatter": true, "reduce_bucket_size": 5e8, "overlap_comm": false, "contiguous_gradients": true }}
多卡使用deepspeed加速使用方法
deepspeed --num_gpus=2 src/train_bash.py \
    --deepspeed ds_config.json \
    --stage sft \
    --do_train True \
    --model_name_or_path  ~/.cache/huggingface/llama2/Llama-2-7b-chat-hf \
    --finetuning_type lora \
    --template llama2 \
    --dataset_dir /app/data \
    --dataset issue_data \
    --cutoff_len 1024 \
    --learning_rate 5e-05 \
    --num_train_epochs 3.0 \
    --max_samples 100000 \
    --per_device_train_batch_size 1 \
    --gradient_accumulation_steps 2 \
    --lr_scheduler_type cosine \
    --max_grad_norm 1.0 \
    --logging_steps 5 \
    --save_steps 100 \
    --warmup_steps 0 \
    --optim adamw_torch \
    --report_to none \
    --output_dir saves/LLaMA2-7B-Chat/lora/train_2024-04-15-15-12-08 \
    --fp16 True \
    --lora_rank 8 \
    --lora_alpha 16 \
    --lora_dropout 0.1 \
    --lora_target q_proj,v_proj \
    --plot_loss True
4.2使用accelerate方法进行加速
CUDA_VISIBLE_DEVICES=2,3 accelerate launch \
    --config_file ../accelerate/single_config.yaml \
    ../../src/train_bash.py \
    --stage sft \
    --do_train \
    --model_name_or_path meta-llama/Llama-2-7b-hf \
    --dataset alpaca_gpt4_en,glaive_toolcall \
    --dataset_dir ../../data \
    --template default \
    --finetuning_type lora \
    --lora_target q_proj,v_proj \
    --output_dir ../../saves/LLaMA2-7B/lora/sft \
    --overwrite_cache \
    --overwrite_output_dir \
    --cutoff_len 1024 \
    --preprocessing_num_workers 16 \
    --per_device_train_batch_size 1 \
    --per_device_eval_batch_size 1 \
    --gradient_accumulation_steps 2 \
    --lr_scheduler_type cosine \
    --logging_steps 10 \
    --warmup_steps 20 \
    --save_steps 100 \
    --eval_steps 100 \
    --evaluation_strategy steps \
    --load_best_model_at_end \
    --learning_rate 5e-5 \
    --num_train_epochs 3.0 \
    --max_samples 3000 \
    --val_size 0.1 \
    --ddp_timeout 180000000 \
    --plot_loss \
    --fp16
5.模型评估
CUDA_VISIBLE_DEVICES=3 python src/train_bash.py \
    --stage sft \
    --model_name_or_path /root/.cache/huggingface/llama2/Llama-2-7b-chat-hf \
    --adapter_name_or_path saves/LLaMA2-7B-Chat/lora/train_2024-04-16-17-17-43 \
    --finetuning_type lora \
    --template llama2 \
    --dataset_dir data \
    --dataset test \
    --cutoff_len 1024 \
    --max_samples 100000 \
    --per_device_eval_batch_size 8 \
    --predict_with_generate True \
    --max_new_tokens 128 \
    --top_p 0.7 \
    --temperature 0.95 \
    --output_dir saves/LLaMA2-7B-Chat/lora/eval_2024-04-16-17-17-43 \
    --do_predict True
数据分为train数据集和test数据集
train数据集:去除整理好的issue数据中的300行到500行的数据,剩下的所有数据
test数据集:整理好的issue数据集中的300行到500行数据
样例:
[
0:  {
instruction:  "回答问题这一要求",
input:  "Ambari中在国产化openEuler22.03 SP1操作系统中安装namenode节点服务时,snappy依赖包冲突,报错信息为: Failed to execute command 'usr/bin/yum install -y snappy', exited with code '1', message: 'Error: Problem: conflicting requests - nothing provides libc.so.6(GLBC_2.4) needed by snappy-1.1.0-3.el7.i696",
output:  "该错误信息可能是由于snappy冲突导致的,可执行`rpm -qa | grep snappy`查看是否已安装,若已安装需要将hdp-utils仓库中的snappy包移走,重新执行`yum clean all; yum makecache`生成repodata,再重新执行即可;若没有安装snappy则建议查看具体的日志信息。"
} ,
1:  {
instruction:  "回答问题这一要求",
input:  "在国产化操作系统openEuler22.03 SP1中安装Ambari时,初始化HDFS、YARN、HIVE等服务配置失败的原因是什么?",
output:  "该问题可能是由于ambari本身在国产化操作系统中不兼容导致的,请检查ambari-server的/usr/lib/ambari-server/lib/ambari_commons/repo_manager/yum_manager.py、/usr/lib/ambari-server/lib/ambari_commons/repo_manager/yum_parser.py,修改响应兼容配置,然后接着安装。"
}
]
对微调前模型使用test数据进行评测

使用train数据进行微调

对微调后的模型使用test数据进行评测(在指标上提升明显)

- predict_bleu-4: 4-gram BLEU 分数,表示生成的文本与参考答案之间的相似度。BLEU 分数越高,表示生成的文本与参考答案越相似。
- predict_rouge-1: ROUGE-1 分数,用于衡量生成的文本与参考答案之间的重叠程度,其中包含一个词的片段。ROUGE-1 分数越高,表示生成的文本包含了更多参考答案中的短语或词组。
- predict_rouge-2: ROUGE-2 分数,与 ROUGE-1 类似,但考虑了两个连续词的片段。ROUGE-2 分数越高,表示生成的文本与参考答案之间的重叠程度更高。
- predict_rouge-l: ROUGE-L 分数,使用最长公共子序列(Longest Common Subsequence,LCS)作为匹配标准,考虑了生成的文本和参考答案之间的最长匹配子序列。ROUGE-L 分数越高,表示生成的文本与参考答案之间的重叠程度更高。
- predict_runtime: 生成文本的运行时间,表示生成模型完成预测所花费的时间。
- predict_samples_per_second: 每秒生成的样本数,表示生成模型在单位时间内处理的样本数量。
- predict_steps_per_second: 每秒生成的步数,表示生成模型在单位时间内完成的步数。步数可以是模型训练的迭代步骤或推理的步骤,具体取决于任务和模型。
OUGE-2 分数,与 ROUGE-1 类似,但考虑了两个连续词的片段。ROUGE-2 分数越高,表示生成的文本与参考答案之间的重叠程度更高。
4. predict_rouge-l: ROUGE-L 分数,使用最长公共子序列(Longest Common Subsequence,LCS)作为匹配标准,考虑了生成的文本和参考答案之间的最长匹配子序列。ROUGE-L 分数越高,表示生成的文本与参考答案之间的重叠程度更高。
5. predict_runtime: 生成文本的运行时间,表示生成模型完成预测所花费的时间。
6. predict_samples_per_second: 每秒生成的样本数,表示生成模型在单位时间内处理的样本数量。
7. predict_steps_per_second: 每秒生成的步数,表示生成模型在单位时间内完成的步数。步数可以是模型训练的迭代步骤或推理的步骤,具体取决于任务和模型。
更多推荐
 已为社区贡献2条内容


所有评论(0)